
How to change: Buzzer
This is the guide on how to change the buzzer on your ROEST.

Where to buy buzzer?
If you are sure your buzzer is broken (you have talked to our Support Team) visit our e-shop to purchase a new one!
Before you start
⚠️DISCLAIMER
Information in this document is believed to be accurate and reliable. However, the manufacturer does not give any representations or warranties, expressed or implied, as to the accuracy or completeness of such information and shall have no liability for the consequences of the use of such information. The manufacturer is not liable or responsible for any problems arising from the attempted repair. The manufacturer reserves the right to make changes to information published in this document, including without limitation specifications and product descriptions, at any time and without notice. The manufacturer's products are not designed, authorized, or warranted to be suitable for use in applications where failure or malfunction can reasonably be expected to result in personal injury, death, or severe property or environmental damage. The manufacturer accepts no liability for inclusion and/or use of its products in such equipment or applications and therefore such inclusion and/or use is for the customer’s own risk.
⚠️SAFETY INSTRUCTIONS
make sure the roaster is turned off
the power cord has to be unplugged
follow the steps as instructed below
Tools

Flat ended screwdriver

Cutters
Parts

Buzzer

Cable ties

M5 x 6 cap head screw
Silicone
Instructions
2. Remove the left side panel.
3. Take a photo of the cable location on the PCB and how cables are fastened to the motor bracket ((LED1) on PCB) to know where to relocate and fasten the new component.
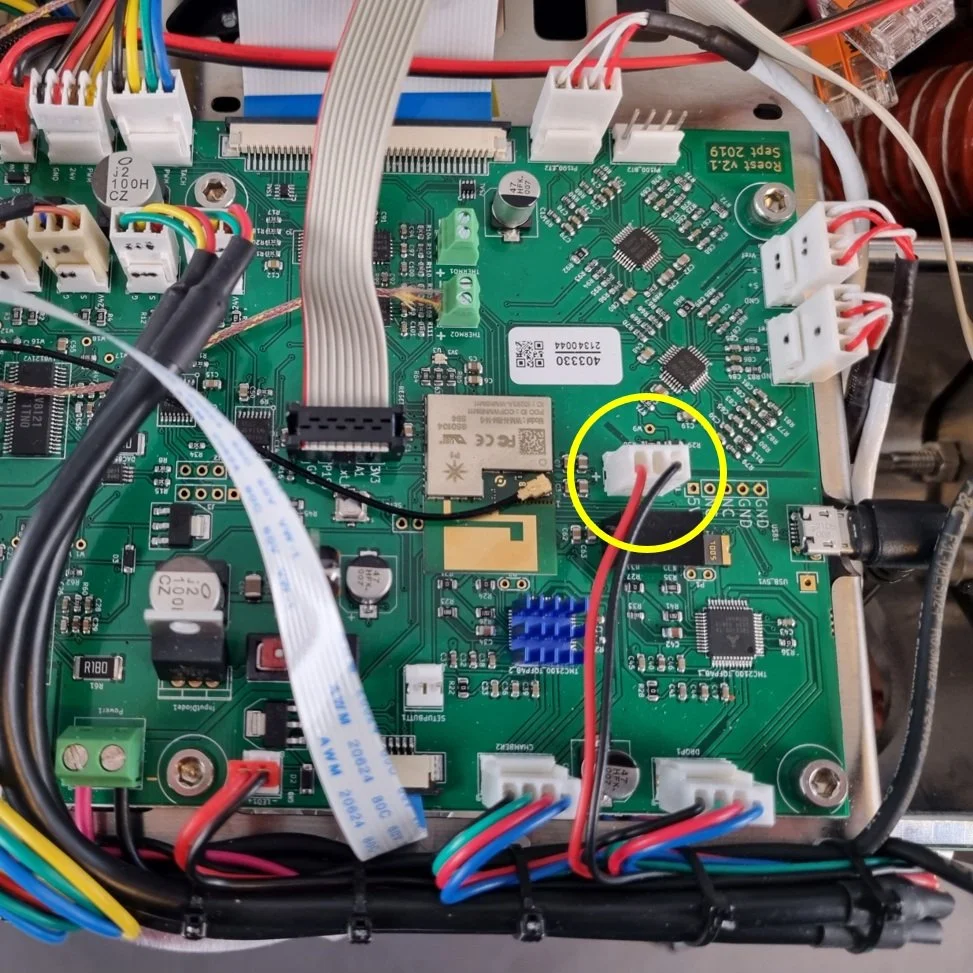
Buzzer connector on PCB

Cables fastened to motor bracket ((LED1) on PCB)
4. Remove the buzzer connector from PCB.

5. Using the small flat-ended screwdriver, pry the faulty buzzer away from the back plate.


6. Cut the cable ties to release the buzzer. NOTE: Take care not to cut through any cables.


Only cut the amount of cable ties required to release cable.
7. Apply four silicone dots around the buzzer, approximately 10-millimeter in size.

8. Install the buzzer.

Locate the M5 x 6 screw through the front of the back plate

Locate buzzer hole into screw and press onto the back plate.
NOTE: Ensure that the orientation of the cable is the same as in the image.
9. Plug the buzzer cable back into the PCB.

10. Cable tie the buzzer back into position.

11. Use cutters to trim the excess ends from cable ties.

12. Leave silicone to dry for approx. 30 minutes before reassembling.
13. Remove the M5 x 6 cap head screw after the silicone has been left to dry for 30 minutes.

14. Install the left side panel.
16. Plug the roaster in, turn it on and test the buzzer. If it doesn’t work, contact the ROEST support team.