
How to remove and install side panels

Before you start
⚠️DISCLAIMER
Information in this document is believed to be accurate and reliable. However, the manufacturer does not give any representations or warranties, expressed or implied, as to the accuracy or completeness of such information and shall have no liability for the consequences of the use of such information. The manufacturer is not liable or responsible for any problems arising from the attempted repair. The manufacturer reserves the right to make changes to information published in this document, including without limitation specifications and product descriptions, at any time and without notice. The manufacturer's products are not designed, authorized, or warranted to be suitable for use in applications where failure or malfunction can reasonably be expected to result in personal injury, death, or severe property or environmental damage. The manufacturer accepts no liability for inclusion and/or use of its products in such equipment or applications and therefore such inclusion and/or use is for the customer’s own risk.
⚠️SAFETY INSTRUCTIONS
make sure the roaster is turned off
the power cord has to be unplugged
follow the steps as instructed below
Tools

2-millimeter and 4-millimeter hexagonal tool
T20 Torx screwdriver or 3-millimeter hexagonal tool.

Padded mat
How to remove side panels
1. Place the roaster on a padded mat to provide a solid base for the machine to stand on once the side panel is removed so it is easier to work with.
3. Remove the trier and the cooling tray to work easier.
4. With the 2-millimeter hex tool, remove the countersunk bolt from the front décor plate (bottom left at the front).

For left side panel removal
For right side panel removal
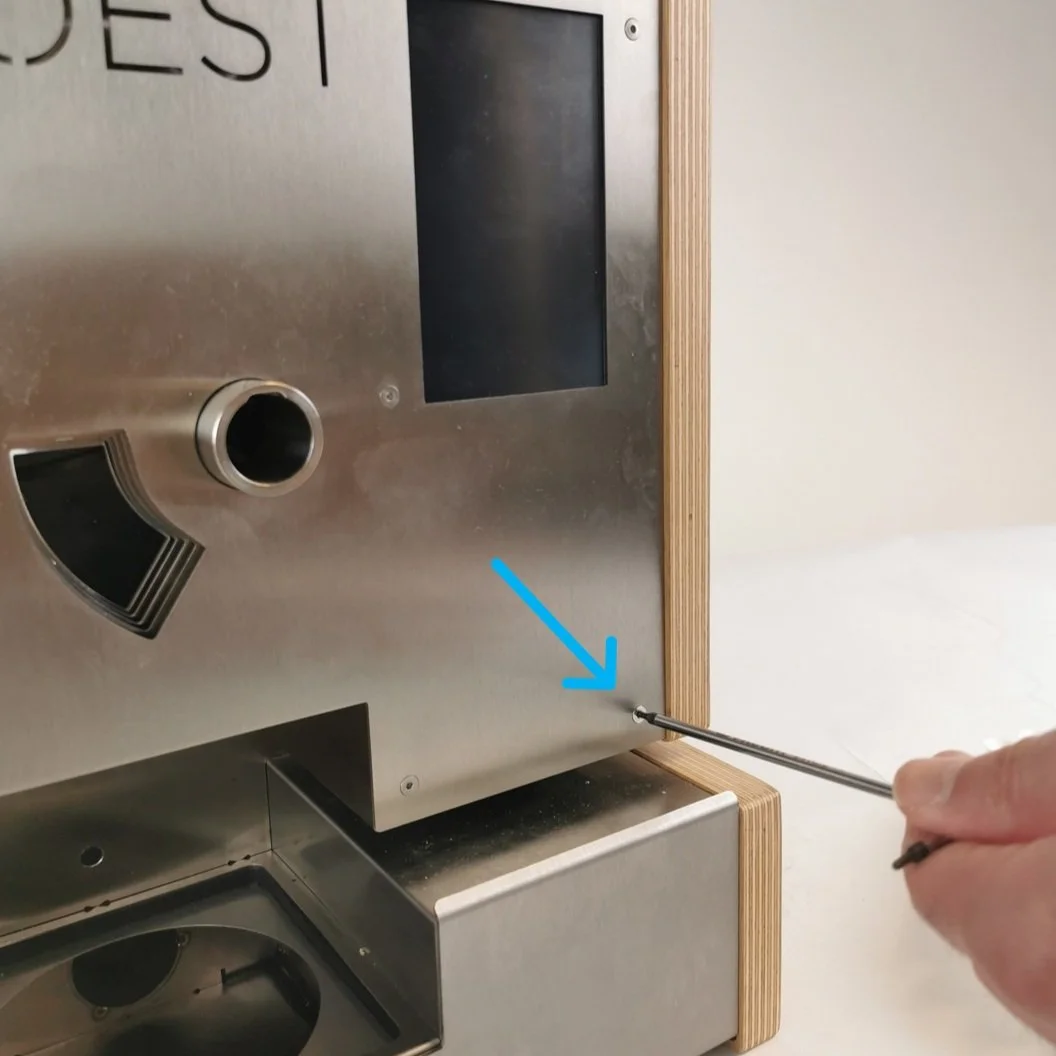
5. Remove the screws at the back. Depending on the machine model, you must use a TX20 (wood) or a 3-millimeters hex tool (black). Some older models have three screws instead of four.

For left side panel removal

For right side panel removal
6. Remove the three screws under the roaster corresponding to the panel you want to take off. You can gently lay the roaster on its side or push the machine to the edge of the table so that the line of screws is visible.

Lay the roaster gently on its side.

Or push the machine to the edge of the table so that the line of screws is visible.
7. When you are taking off the side panel, loosen the cap head bolt (on the inside of the machine) holding the panel in place using the 4-millimeters hex tool.


8. Gently take the side panel off and place it on a protective surface to keep it safe.

How to install side panels
1. Start installing the side panel from the front and below. Fit the sleeve bearing in the wooden panel into the small metal projection on the side.

Metal projection

Sleeve bearing
2. Fit the brackets into the metal plates.

The side bracket of the panel goes inside the front plate

The back bracket of the panel goes below the backplate
3. When installing the left side panel, install the cap head bolts with the 4-millimeters hex tool once it is in place. Tighten it while pushing the roaster together.

Unfired bolt

You can use your body as a counterweight
4. Take the 2-millimeter hex tool and tighten the countersunk bolt on the front. Do not overtighten it.

For left side panel installation

For right side panel installation
5. Install the back screws and the bottom screws. Do not fully tighten them until the last one is in its place.

Push the machine to the edge of the table when installing the bottom screws
6. Once the last bolt is in, push the roaster together (move the side panels inwards) and tighten the screws (no need to apply a lot of torque). Make sure that no cables are being squeezed.
Video instructions
This video shows how to remove and replace the black side panels, but it can also be used for wooden side panels. The only difference is that the type of screws is different.